Mounting, Matting, and Framing
Photographic prints that will be hung on a wall or placed in a portfolio can be shown in a variety of ways. Prints can be trimmed and then tacked to the wall or placed in a box or portfolio. This direct style of presentation places emphasis on the print as a piece of paper and an image to be communicated rather than as a Work of Art. Mounting, matting or framing the print asks the viewer to consider the image more as an object and as a substantial artwork. A backing board, window border or sheet of glass gives the image weight, importance (in that it needs to be protected from buckling, exposure to light and dirt) and defined edges. Using all archival, acid-free materials (i.e., mounting and mat boards, tapes and adhesives), protects the artworks from exposure to contaminants that would cause staining or deterioration. This is referred to as conservation framing.
The artist who wants to create or order a custom frame is faced with myriad choices of molding (the frame material; aka moulding), glazing (the glass or plexiglass) and board and frame color and size. The following section describes the different processes involved in mounting, matting, glazing and framing and the distinct connotations each defines for the image and artwork. These techniques can all be accomplished yourself, with the right tools and a little practice. For a price, commercial framing is available. If you require the expertise of a frame shop but have a small budget, do most of the framing yourself but pay to have professionals cut the window mat or dry-mount a large print.
Mounting
To protect your photograph from bending or wrinkling, to prepare it for framing, or to keep it stiff while hanging on the wall, it is necessary to mount your photograph on a rigid backing. Mounting implies adhering a print to a back board. There are three main techniques: 1) the print is completely adhered to the board using the dry-mount process, 2) the print is held in place on the board with photo corners and 3) the print is held into place at points with hinge-mounts. If you choose to mount the photograph to a back board without a window mat, then the print should be attached in such a way that the adhesive does not show (for example, with dry-mount tissue or folded hinges.)
The dry-mount process remains a common method of adhering photographs to backing because it is inexpensive, easy, and elegant. The process uses heat activated adhesive tissue sandwiched between the photograph and a stiff backing board. A dry-mounted photograph can be bleed-mounted, that is, can extend to the board's edges or may rest within the spatial border of a larger board. This adhesive technique works well for fiber, RC, and digital prints, regardless of whether the photograph is to be matted or framed or to stand alone with the backing.
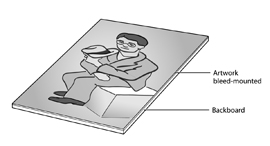
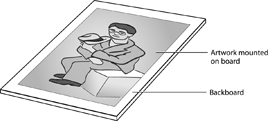
illustration left: Bleed-mounted photograph. illustration right: Mounted photograph with border.
ill. credit: Jacqueline Mahannah.
Unless specially noted, dry-mounting materials are not considered archival: after several decades, acid from standard materials may cause visible damage to your prints. Although it contains acid, the lifespan of the most common dry-mount material - Color Mount - is long enough for many artists. For archival purposes, use an acid-free dry-mount tissue like Buffer Mount. Unlike standard tissue, the acid-free variety can be detached from the artwork years later, which allows artwork to be dry-mounted without altering it permanently.
Although certain dry-mount tissues can be removed from an artwork, this is a difficult process: dry-mounting is considered an irreversible mounting technique. The most common mounting alternative – which does not require trimming, adhering, or otherwise altering the photo – is a set of photo corners. Photo corners are triangular pockets, adhered to a backing board, each of which holds the corner of a rectangular photograph. The advantage of photo corners is that photographs can be easily inserted and removed: corners make it easy to switch photographs in and out of mats and frames. Since photo corners cradle and cover the corners of the photograph, they are not ideal for borderless pictures, but work wonderfully for holding a photograph behind a window mat.
Prints can also be attached to a board with a hinge mount; the methods we recommend involve taping the print into place with T-hinges (aka pendant or tab hinges) or folded hinges. A folded hinge is tucked out of sight under the print: a good option if you want to float the print (to show the edges of the paper within the window mat). For archival purposes, conservators use either linen tape or hinges made of Japanese paper with 100% kozo fibers and cooked starch paste. When archival materials are used to make T- or folded hinges, the hinge (and print) can be easily removed from the board if necessary. Other types of tapes and adhesives (such as cellophane or masking tape, rubber cement, and glue sticks, etc.) will lose their adhesive powers over time and will leave a residue that stains the artwork.
Matting
A front or window mat is a piece of board with a cutout window, through which the photograph is viewed. The print is mounted to the back board and the window and back boards are hinged together with paper tape.
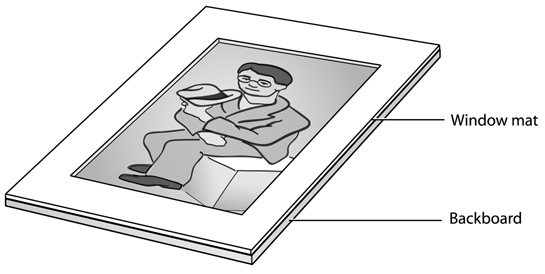 illustration: Jacqueline Mahannah. Window matted photograph.
The mat’s border around the image, often white, separates the image from its surrounding environment, providing a clean, viewing field, free from distraction. A window mat can selectively display the photograph: the window can open onto only part of the photo, thus cropping the image while leaving the photograph whole. Alternatively, you can display portions of a photograph’s printed borders under a window mat or float the photograph by exposing the print’s edges within the window of the mat using a hinge mount.
When used in a frame, the mat keeps the photograph from touching – and adhering to – the frame’s glass. Unlike other presentation techniques, matting can be done entirely with archival materials and it is easily reversed (i.e.: matted photographs can be removed from their presentation materials untarnished). Another advantage of the window mat is that – in case a photograph is handled frequently, as with a portfolio for private viewing – viewers touch the mat rather than the photograph.
Glazing and Framing
Once a print is mounted and/or matted, you can place it in a portfolio, hang it on the wall (with or without glass) or frame and hang the work. If you are particular about the type of wood or frame design, you can build your own. Wooden, plastic or metal commercial frames are available through art supply and home furnishing stores and frame shops.
Framing Styles
All framing styles fall into three main categories: matted, matless, and float-mounted. Whichever style you choose, be sure that your photograph does not touch the glass once it is mounted and set in the frame.
Matted framing
In the most common framing style, front and back mats and hinge or photo corners keep the photograph flattened while the front mat keeps the photo from touching the glass. Matted framing makes it easy to transfer an archivally matted artwork into and out of the frame.
Matless framing
Matless photographs can be shown with or without a border. If a border is desirable, it can be provided by the backboard or by the photograph’s printed borders.
Despite the many advantages of matting, some contemporary photographers choose not to mat their artwork. One common reason is that archival matting materials are expensive. Also, window mats give their enclosed photographs the conservative aesthetic – or aura – of the art museum: a matted photograph seems to play to staid artistic traditions, whereas unmatted or unframed photographs – especially those displayed with no border whatsoever – speak to the unpretentious aesthetic of the snapshot or to the expansiveness (if the print is large) of a stretched but unframed canvas. Many contemporary photographers frame their artwork without any border, which emphasize the image rather than the framing. In this case, the edges of the photograph run all the way out to the edge of the back board, giving the image more visual space. Borderless framing is sometimes called bleed mounting because the print runs to the edge of the board. Matless prints can be dry-mounted on board or front-mounted to plexiglass.
For a formal, protected aesthetic, mount the photographs in the center of the backing with a near-uniform border all the way around: common guidelines are to mount with 3 to 5 inch borders with the image offset about ½ inch above center. For a mounted aesthetic that feels formal yet distinctive, you can vary the spacing and vertical centeredness of the image: try mounting horizontal images near the top of vertically oriented matboard, or vice versa. Of course, before you mount the images, move them around the matboard to determine what proportions will look best.
Floated mounts
To frame a photograph in a way that emphasizes the texture, shape, edges and curl of the paper it is printed on, float mounting is the best option. It allows the paper to hang on its own inside the frame, between the backing and the glass. A front window may be used, but is not necessary; if a window mat is not used, spacers maintain the distance between the glass and the backing. The photograph hangs from hinges, which are placed inconspicuously behind the photograph so that the print appears to float within the frame. If a front mat is desired, the window's inner dimensions should be 1/4” to 1/2” greater than the dimensions of the print; this places emphasis on the print as an object, encased within a tight border.
Materials
Measuring tools: T-square, Pencil, Eraser
Cutting tools: Xacto or Utility knife, Hand held mat cutter and ruler or professional mat cutter
A board's outer dimensions can be easily cut with a knife and ruler; inner dimensions of window mats are trickier. Although large, professional-quality mat cutters are the easiest way to make straight and even cuts, other more economical options are available. Most art-supply stores carry mat cutters that simply slide against the side of a ruler. Specialty cutters create oval-shaped mats. Whichever type of mat cutter you use, be sure to maintain a sharp blade: a dull blade tears matboard rather than cutting it.
Nail File or Bone Tool (for smoothing a board's rough edges)
Boards
Although many materials are light and stiff enough to use as a backing, most are not pH neutral or acid-free, and thus damage paper artworks over time. Some materials contain an alkaline buffer - a chemical balance that is base rather than acidic - so that even after absorbing environmental acidity they will not transfer acid to the artwork. Unfortunately, this alkaline buffer can damage certain types of photographs. We recommend against buffered materials when mounting color photographs.
Foamcore is rigid enough to serve as frame backing or keep mounted photographs flat, but when dropped the corners will crumple and the board will bend, along with the artwork mounted to it. Foamcore can be easily cut with a razor blade, yet is sturdy and does not warp. Make sure the blade is sharp; otherwise, it may tear the foam instead of producing a clean cut. Foam core boards are available in acid-free materials and, usually, two thicknesses: 1/8 and 3/16 inch.
Gatorboard (aka Gatorfoam) is foam board that is extremely rigid. Unlike foamcore, it is warp resistant and withstands changes in humidity without bending. Gatorboard may be cut with a knife, though may be easier to cut on a circular or table saw.
Mat Board is a standard name for heavy-weight board; if you are concerned about using archival materials that will not fade or stain the print, make sure the board is museum-quality, made of 100% cotton fibers and at least a 4-ply thickness. Archival boards are often referred to as Cotton Ragboard or Museum Mat Board.
Dibond, a board made of polyethylene sandwiched between pre-painted sheets of .012” aluminum, is extremely flat, lightweight, and archival and is often used to mount digital images. The aluminum panels may be cut with a table saw, panel saw, or a hand-router. Sturdy and resistant to rust, dibond is often used to support large posters and outdoor signage.
Tapes and adhesives
• Dry-mount tissue
• Release paper (used to protect the print when dry-mounting)
• Linen, paper or framer's tape (acid-free tapes that can be used to attach window mats to backboards or to hinge prints to board; available in water- or pressure-activated adhesives.)
• Japanese paper with 100% kozo fibers (used by conservators to make paper hinges)
Glass or plexiglas
There are several glass options for framing and protecting photographs, but for most purposes regular window glass or clear plexiglass (a clear, plastic sheet) work fine. Regular glass is the least expensive option, but is heavy and dangerous if it shatters. Most hardware stores will cut individual sheets of picture glass to size. Since glass is heavier than plastic, it may be impractical for very large prints. For valuable photographs that will be displayed continually, we recommend using UV glass (or UV plexi) to filter out light rays that can damage photographs. Antiglare glass (and plexi) minimizes reflection on the glass surface, but softens the image overall with its mottled texture. Plexiglass is lighter, just as clear, strong and resilient as glass, but scratches easily and must be cleaned with water and a soft cloth. Do not use paper towels and chemical glass cleaners! Instead, buy cleaners specially made for plexiglass which clean, shine and protect the plastic from scratches.
The Dry-Mounting Process
Here we present basic instructions for dry mounting photographs using a heated press. Dry mounting is possible on nearly any type of backing board imaginable. If you are mounting photographs to be handled (as in a portfolio), use matboard, which is lightweight and excellent for handling. If you will mat and frame the mounted image, use a stiffer backing like foamcore or gatorboard. Consider whether viewers will see the backing, and if so, what color it should be. In addition to the board, you will need dry-mount tissue.
STEP 1: Consider what shape and size you want the backing to be, and how much space, if any, to allow around the photograph.
STEP 2: Measure the photograph's height and width. Measure only the portion of the photograph that will be mounted. Do not include borders in your measurements if you plan to remove them. If the photograph will float inside the backing board (rather than being mounted to the edges), mark the backing board with pencil (your marks should sit just inside the dimensions of the photograph so that they will not be visible after mounting).
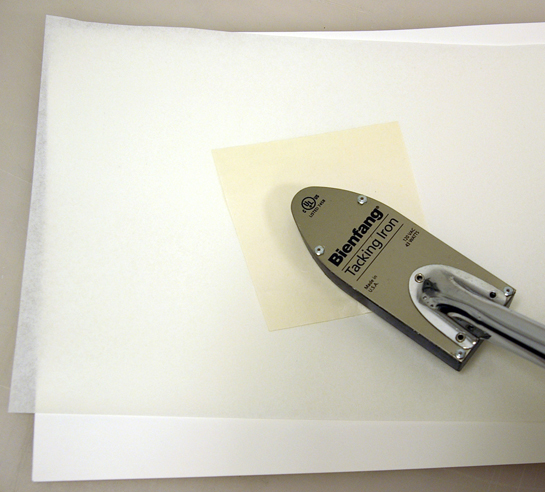
STEP 3: Heat the tacking iron by plugging it into the outlet. Make sure that the piece of dry-mount tissue is slightly larger than the photograph. On a clean surface, place the photograph front-side down. Line the sheet of tissue up behind the photograph so that it extends beyond all sides of the print. Place a small piece of release paper (a special paper that does not stick to either material) in the center of the print; the release paper will prevent the tacking iron from sticking to the dry-mount tissue.
Pressing the tip of the heated tacking iron firmly and flatly onto the center while you hold the photo, tissue, and release paper with your other hand. Pull the tacking iron across the paper for an inch. Be careful not to heat the area too much - especially when using RC paper, which can melt.
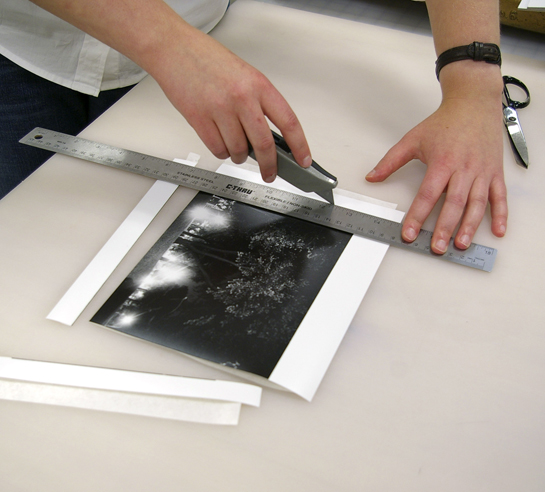
STEP 4: Unless they are already to size, trim the photograph and the attached dry-mount tissue using a paper cutter or a straightedge and utility knife.
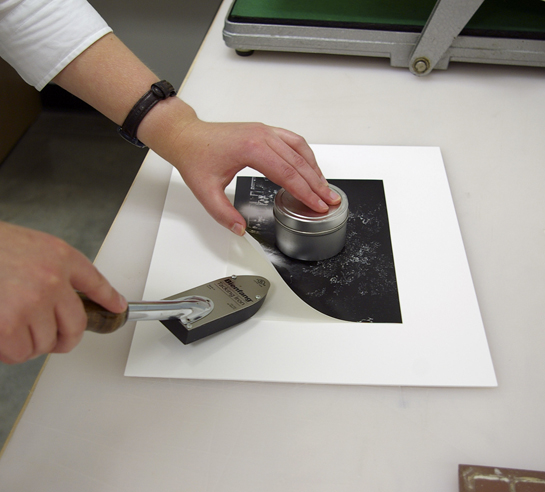
STEP 5: Use the marks you made in Step 2 to center the photograph on its backing. Set a clean weighted object in the middle of the photo to hold it in place.
STEP 6: Carefully curl back a corner of the photograph and use the tacking iron to attach a corner of the dry-mount tissue to the backing on two opposite corners. To prevent wrinkling, pull the tacking iron away from the center out toward the corner.
STEP 7: Heat the dry-mount press. Recommended times and temperatures vary with your materials: 180 degrees F is generally a sufficient temperature; resin-based (RC) paper should only be heated for 60 to 90 seconds, while fiber-based papers should be pressed for 2 to 4 minutes.
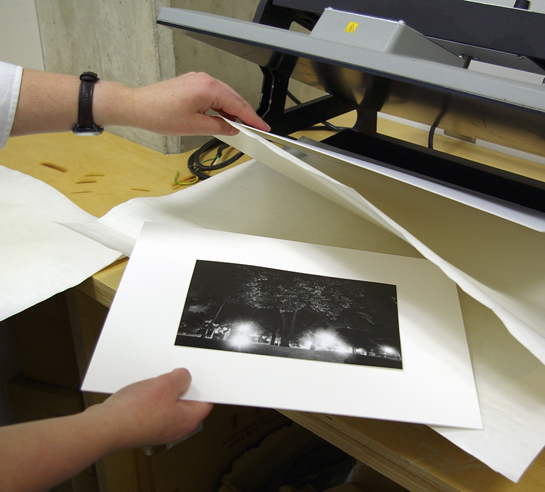
When at the correct temperature, place a clean sheet of matboard and release paper onto the press. Insert the photograph/tissue/backing board into the press (on top of the release paper). Place a second sheet of release paper and then a second sheet of matboard on top so that the artwork is sandwiched between the clean sheets. Close the press to activate the adhesive.
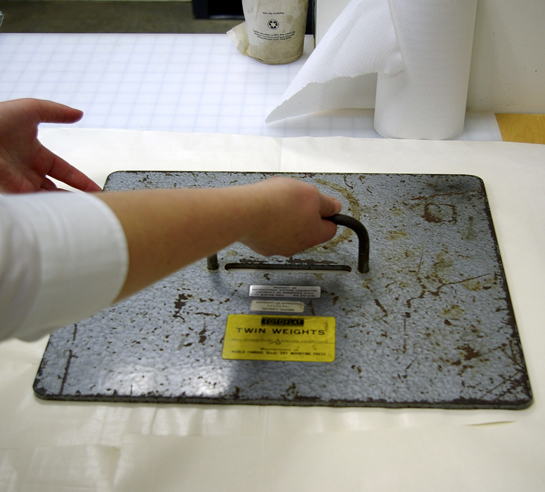
STEP 8: After the appropriate time, remove the artwork from the press. Cool the mounted photograph flat, preferably under a flattening weight. Bonding occurs during the cooling process, so do not test the strength of the mount until the artwork has fully cooled. If you do not want borders around the photograph, trim the board.
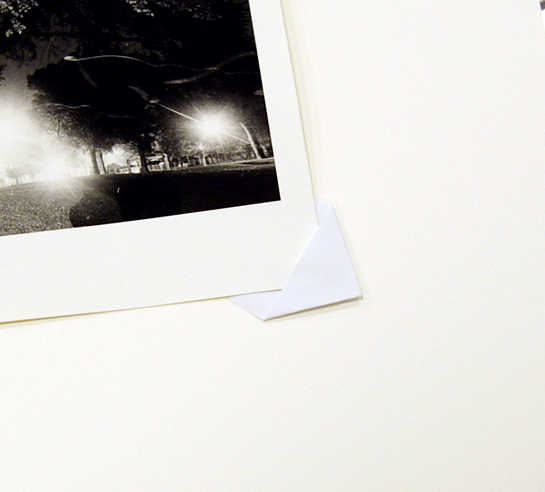
Mounting with Photo Corners
Manufactured photo corners are commercially available, but homemade corners are easy to make and sturdier than commercial ones. To make photo corners, we recommend using a medium-weight acid-free paper, cut into strips. When attached with acid-free tape, these corners are fully archival. Since photo corners cradle and cover the corners of the photograph, the image must 1) have a border wide enough to prevent the photo corner from covering the image or 2) be cropped by the window mat.
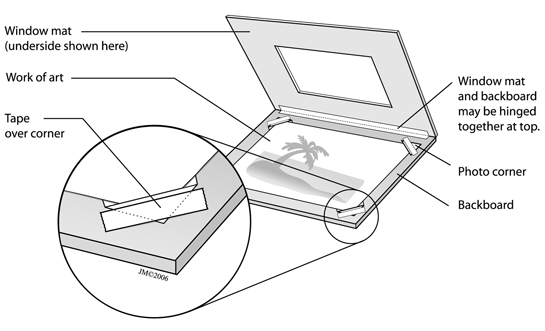 illustration: Jacqueline Mahannah. Use photo corners to secure the photograph on the backboard.
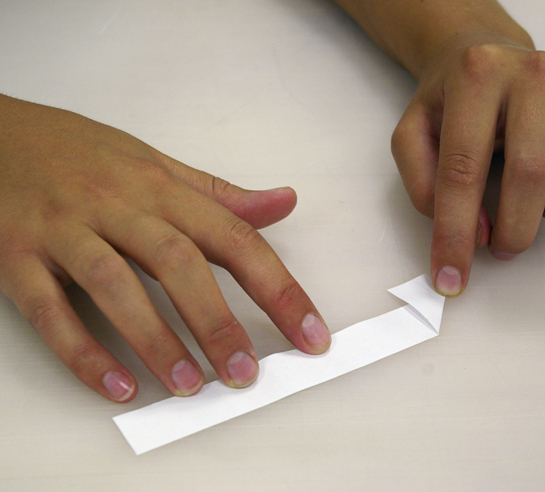
STEP 1: Fold the strip of paper at a 45-degree angle, so that the end of the strip reaches a little past the bottom of the strip.
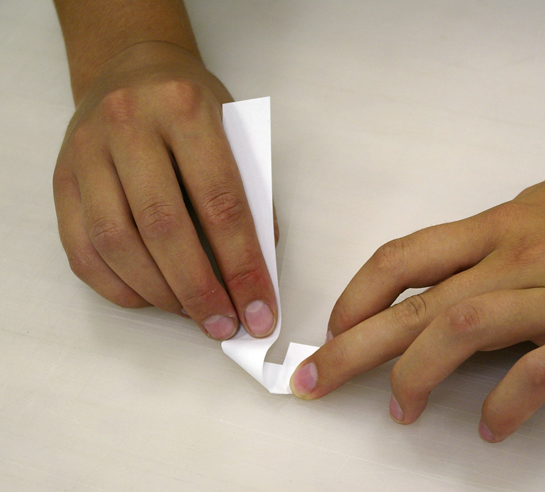
STEP 2: Fold the other side of the strip at a 45-degree angle, flush with the first (see figure 2). The two creases should meet at a right angle.
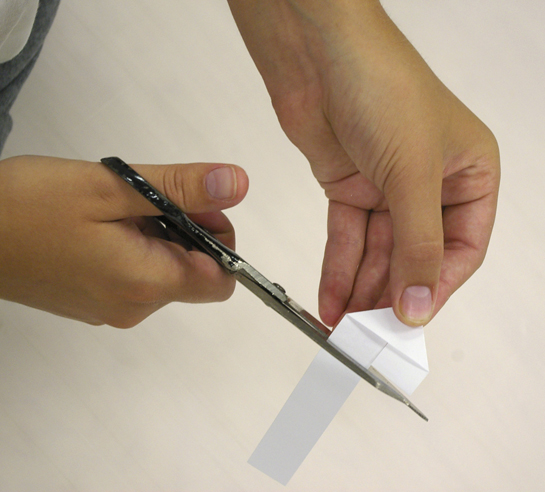
STEP 3: Cut the excess strip so that the two ends are even.
STEP 4: Insert the corners of the photograph into the photo corners: the ends of the strip should be underneath the photograph.
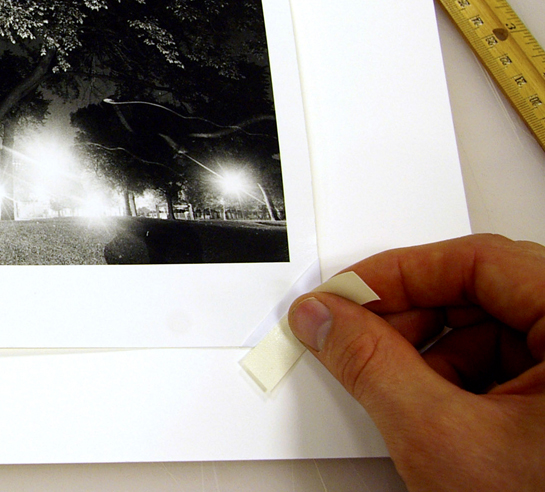
STEP 5: Position the photograph where you want it, and tape each photo corner to the backing. You can use either paper, linen or framer’s tape, as long as it is acid free.
Hinge Mounting
T-hinges and folded hinges are simply strips of acid-free tape used to hold the print in place. Whatever type of hinge you use, the length of the tape will be determined by the size of the print, but, on average, can be four-inches long. The number of strips will depend on the width of the photograph; on average, you should have one strip for every four inches of print. Space the strips out along the print.
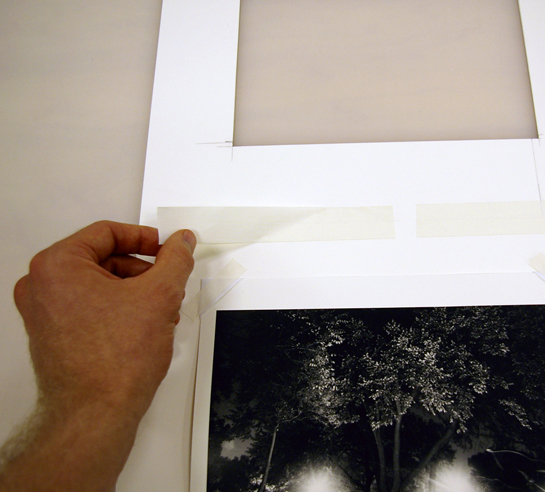
To make folded hinges, turn the photograph front-side down on a clean surface. Adhere half of each strip perpendicular to the top (back) of the photograph; the remaining half of the strip should stretch above the print. Fold those halves back so that if a line were drawn from the fold of one strip to the next, that line would be parallel with the top of the print. Turn the print over and attach the folded tape to the board.

illustration: Jacqueline Mahannah. Use folded hinges to secure the photograph on the backboard.
To mount with T-hinges, turn the photograph front-side down on a clean surface. Cut strips of archival tape about 3-inches long. Adhere 2-inches of each strip perpendicular to the top (back) of the photograph; the remaining inch of the strip should stretch above the print. Turn the photograph over (now, the sticky side of the tape should be up) and move the print in the position you desire on the backboard. Place a strip of tape parallel to the print, over each sticky end (forming a “T”). Press these pieces of tape onto the back board.
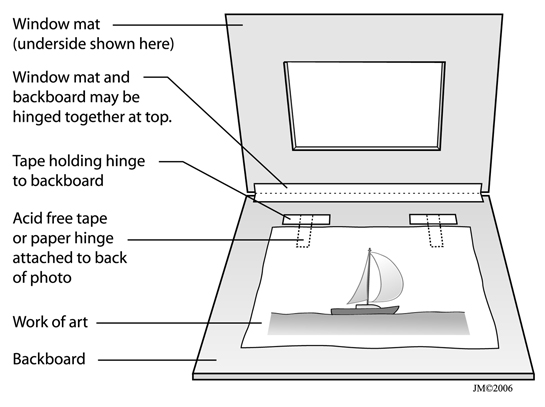
illustration: Jacqueline Mahannah. Use T-hinges to secure the photograph on the backboard.
The Window-Matting Process
Matting the print will involve a back (mounting) board and a front (window) board. For the backboard (the mounting board), we recommend using a solid backing of ragboard, foamcore, gatorboard, or another such material. For the front board of a window mat, we recommend an acid-free board. Here we provide instructions to make a window mat for your photograph:
STEP 1: Determine the size of the window. For a mat to show almost the entire image but cover the paper borders, the window size is usually slightly smaller than the image. If the image has no borders or if you would like to show some of the border area, measure the window to include space outside of the image.
STEP 2: Decide on the orientation and size of the window mat. Do you prefer your mat to be oriented in the same direction as the photograph, or would you rather show a horizontal photograph in a vertical mat (or vice versa)? Next, consider questions of size. Determine the thickness of the borders; most professional framers recommend a minimum of two-inches on any side. Do you prefer the window to be exactly centered or that the mat is weighted on the bottom (that is, with extra space in the bottom portion of the mat)?
STEP 3: Once you have determined the outer dimensions for the front and back boards, cut those pieces.
STEP 4: Once you have determined the window dimensions for the front board, draw parallel lines to form the window rectangle on the front board's back side (the side that will touch the photo and backing). Double-check your measurements and that the window is appropriately centered.
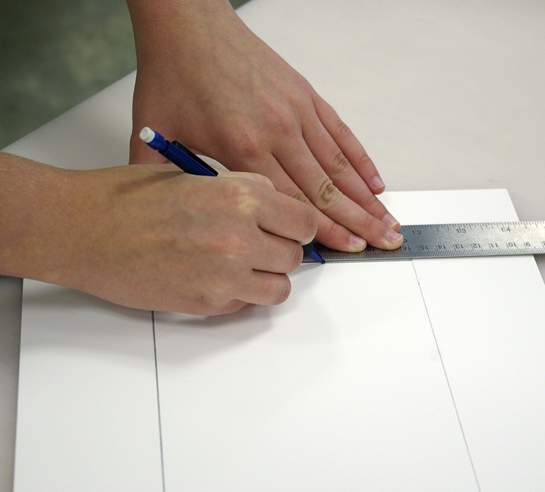
STEP 5: Next, cut out the window using a sharp blade.
You can use a 90 degree cut or a beveled cut. In a ninety-degree cut, cuts are perpendicular to the face of the board. You can use the same tools and to cut the outer dimensions of the backboard and window mat as you use to cut the interior of the window. Beveled cuts are angled from the window mat's face to the back, usually at a 45 degree angle. Professional mat-cutting tools make beveled cuts easier. Although slightly more difficult, we recommend making bevel-cut mats whenever possible.
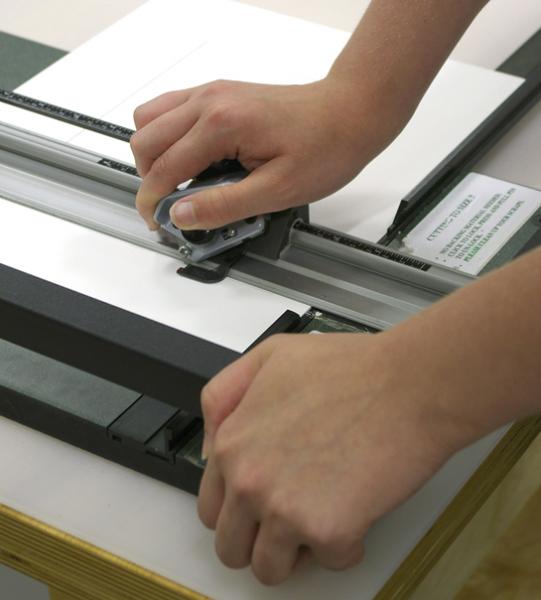
To make a beveled cut, use a mat-cutter with the blade angled down and away from the center of the mat. Be sure you cut in the right direction (on the correct side of the line) so that the bevel is oriented correctly. Secure the cutter and artwork with one hand while tilting the cutter head (to pierce the mat) and pulling the cutter smoothly across the mat with the other (see Figure web.139). Do not cut beyond the guideline.
STEP 6: Remove the cut board from the window. If it does not easily pop out, one or more corners may not have been completely cut. Reposition the board, blade and ruler and re-cut the corner.
When the window pops out, gently smooth any rough edges of the mat with a burnishing bone or nail file. Do not tug at any loose pieces of board.
STEP 7: If dry mounting your photograph, adhere it onto the backing material. If hinge-mounting or using photo-corners, continue to the next step.
STEP 8: Place the front mat on the backboard (as they will look when assembled) and flip the front board open so that it sits flatly on the table (backwards and upside-down) above the backboard.
STEP 9: Adhere the back and front boards together with a strip of linen tape: this inner hinge will remain hidden when you close the window mat over the photograph. Close the mat and allow it to dry for an hour.
STEP 10: If you have not dry mounted the photo, mount the photograph on the backboard using the photo corner or hinge-mount techniques.
Laminates and Front Mounts
If you prefer the sleek, raw look of borderless presentation yet still want to protect your photograph from possible damage, lamination and front-mounted plexiglass are possible solutions.
Laminates are a low-cost way to protect photographs from scratches, fingerprints, and other repercussions of heavy use. However, lamination is irreversible and not recommended for long-term storage. You should laminate photographs only to display them publicly, indoors or out, for short periods of time (a few years or less) before they are discarded.
Contemporary photographers use front-mounted plexiglass to lend their photographs weight and protection while preserving a raw sense of the image: the plexiglass stiffens the display making thick backboards and frames unnecessary. Viewers experience the display as a borderless glossy image, suspended elegantly on the wall. Front-mounted plexiglass is an irreversible presentation technique, so if the plexiglass becomes damaged, the entire artwork is damaged. Despite this, photographs mounted in this way may be preserved with care and appreciated for decades to come.
Displaying a print behind glass or plexi glass.
Matted or unmatted prints can also be displayed by pressing them against the wall with a sheet of glass or plexiglass for protection and support. For this method, simply place two small pencil dots on the wall where the bottom two corners of glass should sit. Push or hammer an L-hook (aka a tenter hook) into the wall one or two-inches in from those points (you may need more hooks or nails if the print is especially large). Push the L-hook in halfway, so that they are steady and will not fall out, but so the hook can be rotated.
Set the glass on the hooks and use the sheet to place two more pencil points at the top - one or two-inches in from the corner. Remove the glass. Nail or push the top hooks into place. Turn the L-hooks so that the L is facing outside of the print area. Turn the “L” so that it faces outside the print area. Set the clean print and glass on the bottom hooks, against the wall. Turn all the “L”s inward to hold the print in place.
* Photo credit: All photos of matting/mounting process, taken by Charles Fairbanks,
MOUNTING/MATTING SUPPLIES:
Light Impressions
Sells matting equipment and materials including mat cutters, archival boards and tapes and dry-mount supplies.
http://www.lightimpressionsdirect.com/
Archivart
Sells products for matting and framing, including museum-quality boards, tissues, papers and storage boxes.
http://www.archivart.com/
University Products
Manufactures and sells archival quality materials including Japanese papers, matting and mounting boards, tapes and adhesives.
http://www.universityproducts.com/
Gaylord Brothers
A great source of archival supplies, including conservation tools and materials, such as adhesives (carries pre-cooked and uncooked wheat starch paste), boards, fabric, and paper.
http://www.gaylord.com/
Talas
Carries bookbinking tools and supplies and museum quality materials including tissues, papers, boards, fabrics and frames.
http://www.talasonline.com/
ANW Crestwood
Imports Asian and European art papers including Japanese kozo paper.
http://www.anwcrestwood.com/
Hiromi Paper International, Inc.
Sells fine art papers used for printing and conservation (including Japanese kozo paper). http://www.hiromipaper.com/
Harbor
Sells heavy-duty signage materials, such as foam boards, metal faced panels (including Dibond) and plastic sheets (such as Sintra).
http://www.harborsales.net/
FRAMING SUPPLIES:
Utrecht Art Supplies
Sells framing materials, such as boards, tapes and wooden, plastic and metal frames. http://www.utrechtart.com/
Pearl Paint
Sells framing materials, such as boards, tapes and wooden, plastic and metal frames. http://www.pearlpaint.com/
American Frame
A great resource for framing ideas and materials; the company sells pre-cut frames and makes custom frames.
http://www.americanframe.com/