Collage
The term collage comes from the phrase papiers collés meaning pasted papers and usually refers to artworks where images or objects are cut and pasted or reassembled. This kind of work is usually based on fragmenting and remixing visual information from various sources. Elements can be cut, scanned, edited, printed and assembled in infinite combinations, either by hand, digitally or in the darkroom. In the book, we describe materials and methods for hand-cut and pasted and digital collage. Here, in our web resources, we provide instructions for making a darkroom collage or combination print.
Darkroom Collage - Combination Printing
Although digital photography is notorious for its capacity to convincingly composite images, photographers have been combining photographs since the medium's invention. In the 1850s, French photographer Gustave Le Gray composited segments from several negatives to produce images (usually seascapes) that had richer and more balanced tones than a single negative could produce. Across the English Channel, Oscar Rejlander and Henry Peach Robinson used multiple negatives to produce elaborate, expressive compositions Rejlander's photograph The Two Ways of Life employed no less than 30 distinct negatives to assemble a group of actors for a morality tableau!
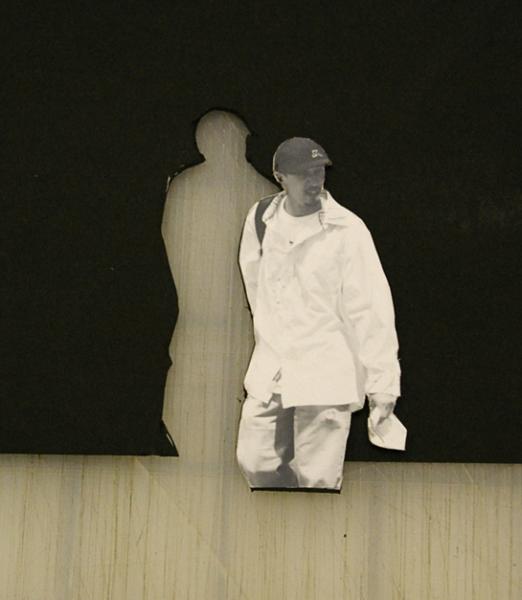
 photo: Charles Fairbanks, perception construction perception, 8x10”, silver gelatin prints, 2006. In this diptych, Charles Fairbanks uses the grain structure of different film speeds. He composited pictures from a fine-grain 100 speed film with greatly enlarged figures shot on 3200 speed film. Fairbanks uses grain to expose the images' substance as molecular, constructed, and photographic.
STEP 1: Expose and process all negatives necessary to assemble imagery for the entire composition. The basic process of combination printing involves exposing an image element to one part of the photographic paper while, simultaneously, shielding the rest of the paper from light.
STEP 2: Print elements separately to determine exposure and contrast or color.
Each negative may contain one or more elements that you utilize for the final composition. When using multiple elements, remember that each bit of imagery may be enlarged to the same or different scales. Determine beforehand the exposure and contrast adjustments for each part of the image. Figure these out by printing each section to size on a separate piece of paper. If you print all elements on one enlarger and need to reposition the enlarger head between sections, mark the heights on the machine's column. If you have access to multiple enlargers, it may be easier to use a separate enlarger for each negative.
While printing, record the appropriate exposure and contrast settings. Make notes about any necessary dodging and burning.
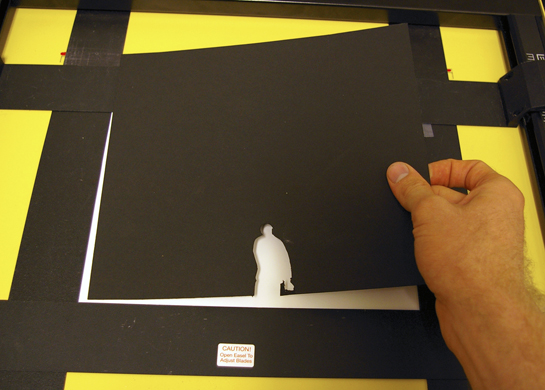
STEP 3: Make cardboard masks.
Use a stiff, opaque material (such as cardboard) to make positive and negative masks. These will be used to shield parts of the paper while printing. Use the photos you printed in Step 1 to guide the size and shape of the masks as you cut. Use an Xacto or utility knife to carefully cut the positive spaces (in the image here, the pedestrians) from the negative space.
STEP 4: Expose the paper while the negative mask is in place.
To assure the mask and printing paper are aligned correctly, consistently position the easels and easel blades. For our example, we used two easels under two different enlargers and aligned the negative mask with the easel blades.
Lay the photo paper in place and position the negative mask on top, then expose.
Step 5: Expose the paper while the positive mask is in place.
Switch negatives and settings.
To align the positive mask, fit the two masks together. Make sure the negative mask is aligned along the easel blades, then remove the negative mask while holding the positive mask securely in position.
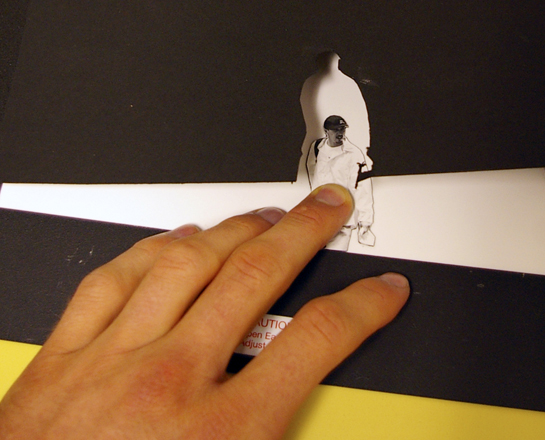
Expose the remaining area.
Continue this process with any other masks.