Other Types of Negatives
Painted Negatives: The Cliché-Verre Process
The Cliché-Verre process is a basic way to create a negative by hand. In the Cliché-Verre process, a negative is drawn or painted and then printed in a wet or dry darkroom. Begin with a transparent base, either plastic or glass. Acetate sheets are non-breakable, easily available at art supply or office stores and come in a variety of weights. A heavier weight will allow more layers of paint.
Paint the image with acrylic paint. The paint acts as emulsion: if the emulsion is too thin or too dense, it will not be printable. When constructing a negative, remember that the image’s black and white values and colors will be reversed when printed. Once dry, contact print the negative in a darkroom or scan it and print digitally.

Darkroom Cliché-Verre
Contact print a cliché-verre negative the same way you would any other negative. Because the emulsion may vary in density throughout the image, make a test print of several exposures. Choose the optimum exposure to make the final print. Here, the color negative is contact printed onto color printing paper.

Digital Cliché-Verre
Scanning cliché-verre negatives allows you to digitally alter the image before printing digitally. To scan the negative, experiment by trying both the Document and Transparency settings on a flatbed scanner to see which gives preferable results. Many scanners give the option of scanning transparent images as negatives or positives. Scanning as a positive will preserve the colors and values of the cliché-verre negative; the image can then be reversed, in Adobe Photoshop (Layer > New Adjustment Layer > Invert). The orientation of the composition can be flipped with Image > Image Rotation > Flip Canvas Horizontal. There may a marked difference in color and value translation between the scanner’s reversal and Photoshop’s reversal.

Making Digital Negatives
Digital imaging has displaced many traditional photographic technologies, yet, at the same time, expanded the possibilities of others. Some historic processes such as cyanotypes, Printing-Out-Paper, Platinum, Palladium, Van Dyke Brown and Gum Bichromate, require large negatives for contact printing. Although it is possible to make large negatives with a pinhole camera, darkroom enlarger, or view camera (Eadweard Muybridge, among others, toted an enormous 18x22” mammoth-plate view camera around Yosemite!) it is also feasible to make them with a computer. Digital editing software enables artists to create and composite images that could not be made in a camera. Printing images digitally as negatives to be contact printed with darkroom or historic processes allows for interesting combinations of modern and late-nineteenth century aesthetics.
Here we provide instructions to make a black and white digital negative for printing with traditional or historic photographic processes. We focus on black and white because most historic printing processes require grayscale or duotone negatives. Gum Printing (also called Gum Bichromate or Gum Dichromate) is the lone photographic printing technique that requires color negatives. Instructions for the Gum technique, a finicky process, can be found on the Internet or in specialty photography books. We describe a general technique for making digital negatives that can be used for several photographic printing processes including cyanotypes, Printing-Out-Paper, Van-Dyke Brown, platinum, gelatin-silver and albumen prints. For most purposes, these instructions will be sufficient; however, if you are interested in further exploring these techniques, we recommend Dan Burkholder's Making Digital Negatives for Contact Printing.
Image mode and resolution
For this process, we recommend working in RGB mode (even if the image is black and white). When photographing or scanning to produce the digital negative image, make sure to use a high resolution. If you begin with a low-resolution image and resize using Resampling (Image > Image Size), the photo will become pixellated. It is always best to start with a high-quality, high-resolution image to avoid pixellation in image enlargements. The image resolution of your digital file should be at least 300 ppi at the size of the printed negative, although we recommend working at a higher resolution (450 or 600 ppi) if possible. When available, scan or otherwise create your image using a high bit-depth setting (in Photoshop: 16 Bits as opposed to 8).
Prepare the image
In Photoshop, open the image that you want to make into a digital negative. Make a copy of the background layer (Layer > Duplicate Layer) to ensure you keep the background untouched. Optimize the image to look the way you want it to be printed in the end, by adjusting brightness and contrast and removing blemishes.

STEP 1: Convert to Black & White.
Convert the RGB image to black & white by selecting Layer > New Adjustment Layer > Black & White. Name your adjustment layer, select OK. In the Black & White Adjustments panel, adjust the reds, yellows, greens, cyans, blues, and magenta channels to control the image tones. For more details about converting to black and white via the Black & White, see the book’s index.

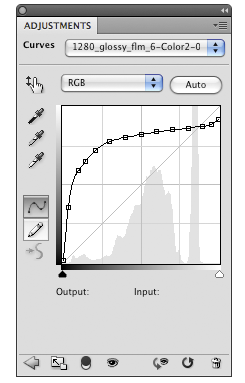
STEP 2: Apply Curve for proper contrast.
You must apply a tone/contrast correcting curve adjustment to the image. Doing so, will ensure that the final print will have the appropriate tonal range for your negative paper, traditional printing process, and inkjet printer combination. Don’t worry if applying the curve makes your image look worse on the monitor. Your final prints will be better because of it. (Note: often artists must tweak this curve after making a test print because of the variables in printing papers and transparency films. You may end up experimenting quite a bit until you create the perfect curve for your process, paper, and printer).
Making a Curve
You can create your own curve by referencing suggested curves found online for your particular printing process (ie. cyanotypes, platinum, gelatin-silver, albumen prints, etc). Once you find an example of an appropriate curve for your paper, process, and printer online, recreate the same exact curve by choosing Layer > New Adjustment Layer > Curves and placing and moving points. If you cannot find a curve specific to the materials or printer you are using, choose one intended for similar materials and adjust it. In the examples below, you can see the difference between curves for different printer and paper combinations.

Downloadable Curves
You can download curves and apply them directly to the image. Dan Burkholder's home page - http://www.danburkholder.com/, provides such downloadable curves. In addition to his book Making Digital Negatives for Contact Printing, Burkholder also sells a downloadable text with detailed instructions and a Photoshop template that includes curves for platinum and silver printing from digital negatives printed on some Epson printers.
If you have downloaded a Curve Profile, create a Curves adjustment layer (Layer > New Adjustment Layer > Curves). Rename if necessary and click OK. In the Curves panel, click on the Load Curves Preset option in the Layers panel menu. Select the curve and click Load. The adjustment curve now fits this paper, printer, and process combination.


STEP 3: Invert the image.
Add a New Adjustment Layer to invert the image by choosing Layer > New Adjustment Layer > Invert. Title the layer and click OK.

STEP 4: Flip horizontal.
Because a digital negative prints best when its inked side touches the photo paper directly, you must flip the image in Photoshop for the final print to match the source. Select Image > Image Rotation > Flip Canvas Horizontal.

STEP 5: Print your negative.
Once the image is adjusted as described in the section above, make a positive print of your negative on standard photo paper to check for any problems you may not have noticed in the file.
When the image is ready, print it on inkjet transparency. Some brands of inkjet transparencies do not hold ink well and in turn produce horrible digital negatives. Many brands work fine, but Dan Burkholder and others recommend OHP Transparency Film and PGHG White Film, both from Pictorico, available at www.pictorico.com.
Check sources online to find the printer settings for each process, printer, and paper combination. If you cannot find specific recommended printer settings, and you are using a printer that employs different inks for matte and glossy paper, experiment to find the recommended ink (matte or glossy black) for your printer, paper, and process combination. Load the paper so that ink is deposited on the correct side; the image will smear if printed on the incorrect side. To help distinguish between the two, most transparencies have grooves or notches in the upper right-hand corner of the correct side to print on.
From Photoshop, send the image to the printer (File > Print). Adjust the page setup to correctly orient the image. In the Print dialog box, adjust Print Settings so that the image is printed at the settings you found recommended online. If you could not find an online source, 1) select the highest possible Resolution (or Quality) setting, 2) disable the High Speed option, and 3) print using full color inks (or Epson’s Advanced Black and White Mode). Once you print, make sure that the ink is completely dry before using the negative.
 photo: Charles Fairbanks. Tell Better Stories (after Timothy O’Sulivan). 5”x7”. Printing-Out Paper print. 2006.
* All Adobe product screen shots reprinted with permission from Adobe Systems Incorporated.